Encouraging manageable lifestyle changes for health and happiness, through research and personal experience.
Showing posts with label Exercises. Show all posts

Friday, October 29, 2010

Workout Without Weights

As a follow up to my last post (regarding the need for strength training in a weight loss program), I wanted to provide some suggestions for resistance exercises you could do at home even if you don't have any equipment. Here are some exercises that will hit all of your major muscle groups, and a few suggestions for how you can progress them over time.
When you are working out with weights, you would most likely select a weight that you could only perform 8-15 repetitions of that exercise before tiring out. When using just your body weight, I would suggest performing as many repetitions as it takes to reach that point of fatigue. If you find yourself doing 30+, then you might want to find a way to make the exercise more challenging.

1. LEGS: lunges, bridges, squats, prisoners squats
I would suggest selecting 1-2 of these exercises per workout.
Lunges: you can move forward, side, and reverse (turning behind you at a diagonal and stepping back forward). You can keep your feet in place and continue lunging up and down, then progress to starting with your feet together and stepping out for each lunge. Try performing a full set and then holding at the bottom and pulsing to get a little more burn.
You can also progress to balancing after each lunge.
Floor bridges: One of my favorite exercises to strengthen your glutes and open your hips.
You can lift and lower on both legs or one leg, hold at the top and alternate leg lifts, and hold at the top and pulse.
Squat: Perform single repetitions, hold at the bottom and pulse, or perform jump squats landing back in the squat position.
Prisoners Squats: Squat low then press up onto your tip toes.
2. CHEST: Push ups, push ups, push ups
Progress from kneeling with your body elevated, to kneeling on the ground, to an incline push up on your toes, regular push up on the ground, and finally a decline push up with your feet elevated.
If you are up for the challenge, check out hundredpushups.com to work your way up to 100 in six weeks.

3. Back: Cobras, supermans, and YTAs
For me, the back is a difficult muscle to work without having weights (or a bar to do pull ups). These are certainly lighter weight exercises, but they would at least keep your back muscles "activated."
Cobra: Keeping your feet pressed into the ground, lift your chest and shoulders off the mat. Make sure to squeeze your shoulder blades in order to activate your upper back.
Superman: Lifting opposite arm and leg, alternate from side to side. This will focus more on your core and lower back.
YTA: This can be performed standing or with your stomach on a stability ball. From standing, come into a partial squat, bending forward at the hips. Start with your arms together in front of you (picture 1), lift your arms into a high-V (Y), back to starting position, then out into a T, back to starting position, and then out into a low-V (A). Focus on squeezing your shoulder blades together each time. Picture 3 shows the balance option, performing the series standing on one leg (still in a partial squat and bent forward).
You can also transition between the Y-T-A without coming back to the starting position in between. If you have light dumbbells, you can add those as well.
4. Arms: Dips and close-arm push ups
Both of these mostly work triceps. Biceps are another difficult one to focus on without weights to do curls or a bar to do close-arm pull ups.
Dips: Find a chair, bench, or step to use for dipping. Fingers should face forward, elbows should point back (not out to the sides), and hips should drop close to the bench (instead of further forward). Increasing the height of your bench and also propping your feet on another surface will help to challenge the move.
Close-arm push ups: bringing your hands closer together (right under your shoulders) and keeping your elbows close to your sides while performing push ups with add more focus to your triceps.
5. Core: Plank with knees and "the dead bug"
Plank with knees: Hold a push up position and pull one knee to the same elbow or opposite elbow.

Dead bug: Lift your arms and legs up toward the ceiling and then alternate lowering opposite arm and leg - don't let them touch the ground. Make sure to press your lower back into the mat. Bending your knees and limiting your range of motion will make this exercise easier, straightening your legs and dropping them closer to the ground will make it more challenging.

So there you have it! I would suggest performing 2-3 sets of each of the exercises you chose to do. Keep your heart rate up by performing 30-60 second cardio spurts in between each set.
Do your strength training exercises 2-3 days a week to make sure you maintain (and hopefully increase) your muscle mass and your metabolism! It should only take you ~30 minutes.
Let me know how it goes, if you have any questions, and if you have any other great exercises to add to the list.
Have a HEALTHY day!
~ Fit Britt
PS - the 'model' in this post is sporting the ExerSpy arm band with counts how many calories you burn each day (as well as your steps, physical activity, and sleep efficiency) - a great tool for managing your weight loss that can be purchased here (as well as any other fitness equipment needs!)
Posted by Picasa

Tuesday, June 29, 2010

Hard CORE Pregnancy

Having many friends that are currently pregnant, as well as receiving a few personal questions, has lead to this post focusing on core exercises during pregnancy. Certainly, these exercises can be done by all individuals, and can be modified in order to make them more gentle or more challenging depending on your needs.

First up: Cat and Cow stretch
Make sure your knees are directly under your hips and wrists under shoulders.
Exhale as you drop your hips and chin, lifting up through your mid back (cat stretch) and inhale as you lift your head and hips, allowing your mid back to drop through (cow).

Next: Spinal Balance
Still kneeling, wrists and knees in line with shoulders and knees (respectively), shift your hips to create a flat back (no arch, no curl). Make sure to keep your belly button pulled into your spine as you go through the following motions.
Start by lifting one arm at a time, hold and balance.

You can also do one leg at a time (make sure both hips stay facing the ground - no need to lift the foot any higher than hip height).
When you are ready to add the two together, lift opposite arm, opposite leg. Try to minimize the arch through the lower back, keeping your body as straight as possible. Variation: Fire Hydrant
For lack of a better name, in this pose you'll be on all fours, lifting one leg out to the side. Continue to keep the stomach pulled in, no arch in the lower back, focus on balance and toning the outer thigh. You can continue lifting up and down, or hold at the top and pulse.

The stability ball is a great tool for strengthening the core, and hopefully reducing tension in the lower back.
Ball sit:
Easy enough, try to sit on the stability ball whenever you can! If you work at a desk, sit on the ball instead of in a chair. While watching tv, sit on the ball. Sorry, you won't be able to recline, but you'll be working your core, perfecting your posture and relieving back pain!
Adding a little movement will provide a greater challenge and help build better coordination and strength. My caution for the pregsters, make sure you don't challenge your balance so much that you are at risk of falling!
Ball roll:
Move your hips around in a circle, try going fast, slow, small circles, large circles, switch directions, etc.
Ball march
Only if your balance and coordination allow, sit up tall, engage the belly, and slowly lift one foot. Switch feet. Overtime, try and lift a little higher or hold a little longer.
Low back pain is caused by more than just "a weak core." Having muscular imbalances through your legs can also contribute. The ball bridge will help to open up the front of your hips and activate/strengthen your glutes and hamstrings.
Ball bridge:
Sit on the ball and roll out until your upper back and shoulders are resting on the ball. Place your hands on your hips and lower your hips toward the ground.
Then press the hips upward to create a straight line from your shoulders to your knees. You can keep moving (up, down, repeat), or you can practice holding at the top. Squeeze your glutes and remember to breathe!
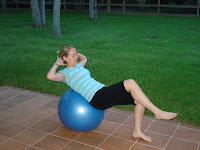
Finally, a few variations on the crunch. While you probably don't want to lay on your back for extended periods of time during your pregnancy, you can continue to crunch on the stability ball!
Stability ball crunch
Start sitting on the ball, and roll down slightly until the ball is supporting your lower back. Make sure to keep your ankles in line under your knees. Lift with the abs, up and down. If you feel too much strain, walk your feet out a little more so that the ball rolls a little higher into your mid-back.
Stability ball crunch with twist
If balance allows, try adding a little twist with each crunch
Stability ball crunch with march
First start by just holding the crunched position. While keeping your upper body still, slowly try and lift one leg and switch. Over time, try to hold your leg up a little higher or possibly add a little crunch to the mix.
Have fun and make smart choices! Pregnancy is not the time to kick your workout into high gear, but rather focus on staying healthy, comfortable, and maintaining your previous fitness level.
Have a HEALTHY day!
~ Fit Britt

Saturday, May 22, 2010

Fit Britt Now Has Your Fitness Needs!

It has arrived! My online fitness store is up and running!

http://www.myhfpn.com/1073

Check it out if you are in need of any equipment for strength training, flexibility, yoga, weight management, supplementation, etc.
Everything you need to start a home gym!
I'd be happy to make recommendations and get you started with a free program (specific to your needs and goals), based on the equipment you own and purchase (resistance ball, dumbbells, medicine balls, BOSU ball, resistance tubing, kettle bells, etc!).
No matter where you live, I can set you up with a free 14 day trial to the DotFit website, where I can create exercise programs for you, send you videos and articles, and even skype to check your form and your progress!

Indeed, I make a small profit off of every sale on my site, so I certainly appreciate the support!
I hope to highlight certain products for you over the weeks. Many of you know I have been wearing (and LOVING) the ExerSpy arm band so stay tuned for my praise about that soon!

Have a HEALTHY day!
~Fit Britt

Saturday, March 20, 2010

Put Your Best Foot[wear] Forward

As Spring makes an appearance and we spend more time being active, there is one piece of fitness equipment more important than all others... proper footwear!
We all know the foot bone is connected to the leg bone which is connected to the hip bone... but we often fail to realize that the pain we are having in our knees or lower back is due to our footwear and improper body positioning.
There is more to picking proper footwear than just picking out the most stylish, pair of sneaks at your local athletic store. It is very important to select footwear that is geared towards your body movement, the height (or lack there of) of your arches, and also your planned activity.
Gait Analysis
It would be best to go to a running store where the staff are knowledgeable in performing gait analysis - watching you walk, run, and checking the wear on your old tennis shoes in order to determine if you pronate or supinate.

Pronating involves your feet/ankles turning inward with each step, and is fairly common with low and flat arches. Pronators need stabilizer shoes that have more support on the insole.

Supinating involves rolling your foot outward, with the majority of the weight on the outside of your foot. There are also special shoes for supination with more support on the outer edge of the shoe.


When you go to an actual running store, the shoes should be labeled as stabilizers, neutral shoes, etc. However if you just go to a basic tennis shoe store, they may not label the shoes by type, but you can tell what type of shoe it is by where the darker, more supportive base is, like so:

Additionally, regardless of what type or brand of shoes your purchase, you should also get more supportive inserts. Two types that I use and enjoy are SuperFeet and Lynco orthotics. Both come in different styles for different activities and shoe types (athletic, casual, dress, etc.)

I would encourage you to either purchase your shoes and inserts together, or purchase the inserts in advance and take them with you to try on shoes.Also, remember that your tennis shoes should be replaced every SIX MONTHS or 500 miles. Most individuals complain of knee pain when the shoes are too old and no longer supportive. One rule of thumb for tennis shoes or any of your shoes is to try and bend them backwards. If the toe and the heel wrap around towards each other, there is no support left in your shoe!

These were my favorite shoes, which used to be very comfortable and supportive. But last December when I started having a lot of foot pain, I went to both an orthotic shoe store and a podiatrist and both of them commented on the lack of support of these shoes.Alas, we need to be making smart decisions about supportive footwear all the time, not just when doing activity. Don't buy shoes that are uncomfortable, unsupportive, and your toes don't have space to wiggle. And ladies, remember that when wearing heels all day long, you are keeping your ankle in "plantar flexion," which tightens the calves. Therefore, upon taking off your heels, make sure that you warm up slowly and stretch your calves thoroughly before taking off on your activity of choice.
We often don't make the connection that our knee, hip, back pain is coming from the footwear we've selected. I challenge you to check the shoes in your closet and make a commitment to make smart and healthy decisions for your feet and body with future purchases.

Finally, just a few suggested stores to check out:
- If you are in the DC area, look up a Pacers Running Store
- College Station friends check out Shoe Daze (they have casual shoes as well as running).
- All others - do your best to find a running store and specifically ask them if they perform gait analysis. (Let me know if you find a good one!)

Good luck and may your future steps be light :)

Have a HEALTHY day!
~Fit Britt

Thursday, October 22, 2009

Yoga Part II: Sun Salutation

The Sun Salutation is an integral part of the Vinyasa yoga practice.
It is usually performed toward the beginning of a practice and can be a useful way to "warm up" and elevate the heart rate before performing deeper, longer stretches and strengthening poses. It can also be an enjoyable meditative practice; an opportunity to relieve stress and flow with your breath to a series of opposing flexion and extension poses.
This past Sunday turned out to be a beautiful day to "solute the sun," so I have some pictures to share with you from the neighborhood lake in order to walk you through your Sun Salutation.


Mountain Pose:
Standing with your feet shoulder width apart, disperse your weight evenly from
left to right and front to back. Strengthen your thighs and glutes, lift your
spine tall and roll your shoulders back. Keep the head lifted. This is an excellent opportunity to practice "perfect posture" which will be challenging for most of us.


Full Sun:
Inhaling through your nose, lift your arms to the sides and above your head into full sun.
After you've performed a few repetitions, and your spine is warmed up, you can even add a little back extension here by looking up and back.

Swan Dive:
On your exhale, sticking your hips back and keeping a slight bend in your knees, slowly fold to the ground with a flat back. The hips back / knees bent is very important to make sure you are not putting any strain in your lower back.

Forward Fold:
Finishing your exhale in the forward fold, dropping your head down, looking through your legs behind you. While in the folded position (if you plan on holding it for a little while), make sure you support your weight by putting your fingertips on the ground, or placing your hands on your shins. Again, this helps to prevent unnecessary pressure in your lower back.
Lunge:
On your next inhale, step back with one leg into a deep lunge. Drop the hips and lift the head and chest. If you are doing option 1 that follows (child's pose), you can drop back to a kneeling lunge, pressing your back knee into the mat.


Option 1: Child's Pose
For a beginner, or anyone seeking a more gentle practice, stick with option 1 for the next few asanas. After your lunge drop both knees to the ground and press back into child's pose as you exhale. Your fingertips reaching forward while your forehead presses to the mat.


Option 2: Down Dog
As you advance, or for a more intense practice, from the lunge position, step the other leg back and exhale as you lift your hips up to the sky. Focus on pressing the heels into the ground and keeping your shoulders relaxed. Think about sliding your shoulders "down your back" and tucking them into your back pockets, keeping your shoulders away from your ears.


Option 1: Kneeling Plank
Inhale as you shift your weight forward into a kneeling push-up position. Your hips should be in a straight line with your knees and shoulders and your abdominals are kept tight.


Option 2: Plank
From down dog, shift your weight forward into a push up position on your toes, inhaling as you come forward. Abdominals are tight and your arms are strong.


Option 1: Kneeling Crocodile
Slowly and with control, keeping your elbows close to your sides, gently lower yourself toward the ground for the entire length of your exhale. Over time, work on building strength by holding this position. The more you keep your elbows tucked in, the easier this will be.


Option 2: Crocodile
From the plank pose, shift your weight forward by pushing with your toes and slowly lower, keeping your elbows close to your sides. If it seems too challenging at first, feel free to drop to your knees as you lower down, then work on building the strength over time.


Option 1: Baby Cobra
After lowering all the way down, inhale as you lift your chest slightly, using your hands for additional support. As you flow through multiple sun sal's, you may be able to lift your chest a little higher, however, never lift higher than you feel comfortable. This should feel like a nice opener for your abdominals and chest, and a strengthener (not causing strain) for your lower back. If there is any irritation, stay low. You will notice your flexibility will be different every day you perform these poses.


Option 2: Full Cobra
If you have the back flexibility, after lowering your crocodile pose, inhale as you lift your chest and press higher with your hands. Don't feel the need to straighten your arms completely, just lift as high as is comfortable for your back. Just because you are choosing option 2 doesn't mean that you have to perform the full cobra. Having a low-back injury myself, I often perform all the other moves on my toes, but then opt for the baby cobra, unless I am feeling very warm and flexible.


Option 1: Back to Child's Pose
Gently lower your chest and press back to child's pose while exhaling.


Option 2: Back to Down Dog
From Cobra, tuck your toes under and press with your arms as you lift your hips back to the sky, pressing the heels into the ground, back to down dog. Exhaling as you press into this position.


(Whether you are following Option 1 or 2): Lunge
Step one foot forward into the lunge position, taking the time to work your foot back up between your hands. Dropping the hips and lifting the chest as you inhale. Checking to make sure your knee and ankle are in alignment (and that your knee is not past your toes). I have found that it is more difficult to step forward into a lunge (achieving proper form) then it is to step back into the lunge that we do towards the beginning of the salutation. Take the time to inch your foot forward so that your knee comes into proper alignment.

Forward Fold:
Stepping the other foot in as you exhale and sink into your forward fold, remembering to drop your head and keep your weight supported.

Reverse Swan Dive:
Inhale, sticking your hips back and keeping a slight bend in your knees while lifting with a flat back (again, supported through your hips).

Full Sun:
Finishing your inhale by standing tall and reaching back up into full sun.

Mountain Pose:
And finally exhaling your arms back to your sides into mountain pose, checking to make sure the feet are in alignment with the toes facing forward with your hams and glutes contracted.
-----


This completes one sequence of the sun salutation. I suggest performing an even number and making sure that you alternate which leg you lunge back (and forward) with each time.
After performing 6-10 salutations, you'll probably be feeling pretty warm and ready to attempt additional yoga stretches! However, I've also used the sun salutation as a nice break from a study session, to help clear my mind, and also after a long day of sitting/traveling in order to stretch and strengthen each area of my body.
While I certainly emphasize proper form to all of my classes, it is most important that you release any feelings of judgement or competition with yourself or with others. Resist comparing the way you feel or look in the pose to the pictures you see here, or other ideas you have about these poses. Each day will be different. Some days you will feel strong, balanced and flexible, others you will feel off balance and/or inflexible. That is all part of the journey and discovery of becoming in tune with our bodies.
Keep in mind all the great benefits of yoga that I briefly introduced in the last post about Yog-aaahhhhh. And stay tuned as the next post will give you greater detail and explanations for why and how those benefits can be achieved.

Have a HEALTHY day!

~ Fit Britt

Followers